
Template Designer
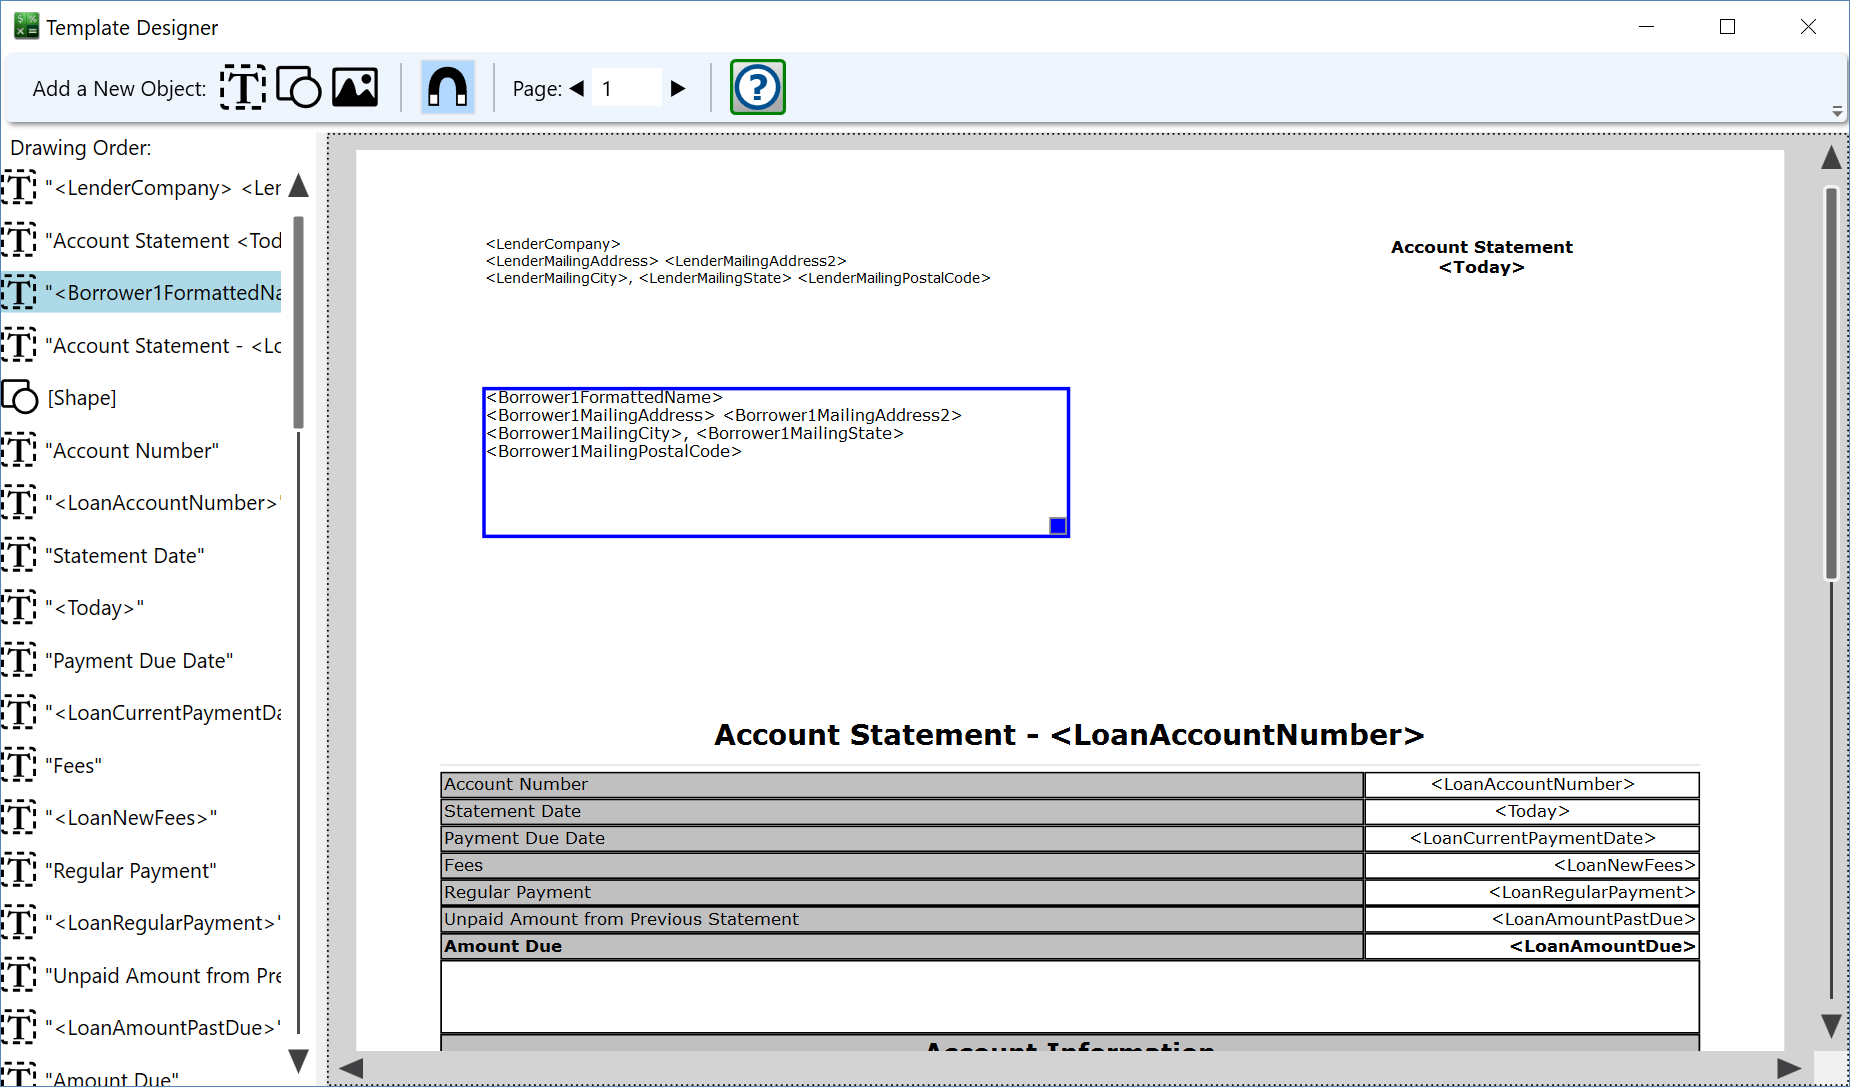
The template designer allows you to lay out the elements of a statement.
Across the top of this window is the toolbar with buttons. Along the left side is the drawing order list. The rest of the window is the template preview.
The first three buttons on the toolbar allow you to add text, shapes or images on the template. Click a button once to enable it, then click with the left mouse button and drag a box on the template page to place the selected object. Release the left mouse button to create the object, and a dialog will open where you can set the properties of the object - enter the text, choose the image or shape, etc.
Editing a text object – besides typing the text itself, the Edit Text Box dialog lets you enter an exact position and size for the box using the Left, Top, Width, and Height boxes. Click Font to choose the typeface, style, and size, and click the Text Color swatch to pick the color of the text. Check Border or Background and click the swatch beside each one to outline the box or fill it with a color. Click Insert Template Tag to open the tag browser and insert a substitution tag at the cursor. Use the capitalization drop-down to print the text as typed (Normal) or force it to all Uppercase or all Lowercase, and use the alignment buttons to align the text left, center, or right and top, middle, or bottom within the box.
Editing an image object – use the Position and Size boxes to enter, in inches, exactly where the image sits on the template and how large it is drawn, and click Browse to choose the image file. (In Moneylender Online the picture is uploaded from your computer through the browser.)
Editing a shape object – pick the Shape Type (Rectangle, Rounded Rectangle, Oval, or Line), then choose Fill Only, Border Only, or Fill with Border to control whether the shape is drawn solid, as an outline, or both. Enter a Border Thickness to set how heavy the outline is drawn, and click the Border Color and Fill Color swatches to pick the colors. The Position and Size boxes work the same as they do for text objects.
Template Tag Browser – when inserting a tag, type in the Search Tags box to narrow the list to tags whose name or description contain what you typed, then double-click a tag on the list to insert it at the cursor.
Left-Click on any object on the template preview or drawing order to select it.
Right-Click on any object on the template preview or drawing order to edit its properties.
When an object is selected, left-click and drag in the template preview to reposition the object on the printed page.
Click and drag the blue box in the corner of the selected object to adjust its size.
Left-Click and drag an item in the drawing order list to change its position in the drawing order.
Hold Ctrl on your keyboard while selecting to select multiple objects. Continue holding control while dragging to reposition multiple objects together.
Press the Delete key with an object selected to delete it from the template.
The Magnet button on the toolbar can be toggled on and off. When on, objects will snap to the edges of other objects on the template.
Multiple Pages: Use the arrows or enter a number to change the page being edited. Templates can have an unlimited number of pages.
The page buttons on the toolbar also let you rearrange the template's pages: move the current page in front of the previous page or after the next page, add a blank page to the end of the template, insert a blank page in front of the current page (moving this and the following pages back), or delete the current page.
Use the copy and paste buttons on the toolbar (or Ctrl-C and Ctrl-V) to copy the selected template objects and paste them onto the page currently being edited.
All edits to position and size are immediately saved, so you can close this window at any time and your changes will be saved.