
Loan Borrower Setting
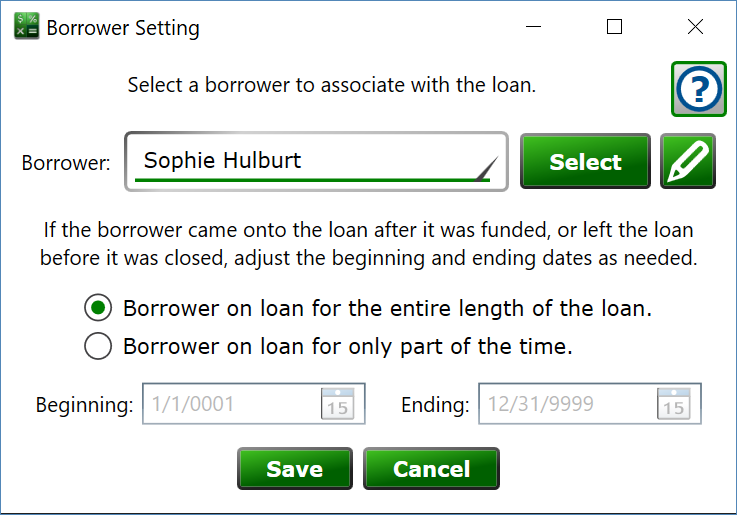
You can get to this window by selecting a loan in the main list, clicking on the Settings tab on the Loan Details panel on the right. At the bottom is the Borrowers section with the list of borrowers on the loan. Click the New (plus) button to add a borrower to a loan. Select an existing borrower on the loan and click the Edit (pencil) button to make changes to their settings.
On this window you can attach a borrower to the loan and control the period of time that the borrower is attached to the loan.
Borrower – click Select to choose or add the borrower to your portfolio. This opens the Manage Borrowers window where you can search, add, edit, and select borrowers in your portfolio.
Edit (pencil) button – if a borrower is selected, you can click this to open the borrower wizard to make changes to the borrower’s record. It’s a convenient way to edit the borrower if you need to update an address or phone number, for example. If no borrower is selected, this button is disabled.
Borrower on loan for the entire length of the loan – this is most common, select this if the borrower will be attached to the loan from the time it was opened until it is closed.
Borrower on loan for only part of the time – you might use this setting when a property is sold and you allow the new owner to take over the loan, for example.
Beginning – the date when this borrower is associated with the loan.
Ending – the last date the borrower is a responsible party on the loan.
Include borrower on email statements, even if not primary – check the box to send emailed statements to this borrower even when they are not the primary borrower on the loan. (Note: additional borrowers are added to the To field of the emails when sent as opposed to generating separate emails individually addressed to each borrower. Moneylender sends the same email with multiple addresses in the header, so you'll only see "one email sent" on the Print Template window's email result, but the email might be addressed to many people. Also, if the PDF attachment on an email is locked with a password, the password is the primary borrower's password, and additional borrowers will not be able to open the attached file unless they know the primary borrower's PDF password.)
Include borrower when reporting to credit bureaus – shown when Metro2 reporting is enabled on the portfolio. Check the box to include this co-borrower in your Metro2 credit reports; the primary borrower is always reported.
ECOA Code – shown when Metro2 reporting is enabled. Pick the code that describes this borrower's contractual responsibility for the account when reported to the credit bureaus (Individual, Joint Contractual Liability, Authorized User, Co-maker or Guarantor, and so on) — each option on the list includes a short description.
Info Indicator – shown when Metro2 reporting is enabled. If the borrower has a bankruptcy or similar status to report, pick the matching Consumer Information Indicator; leave it BLANK to retain the previously reported value.