 |
Template Designer |
 The Template Designer is a sophisticated tool for creating and modifying templates within your portfolio file. Select from the main menu. Click on a template, and choose Edit Template Layout.
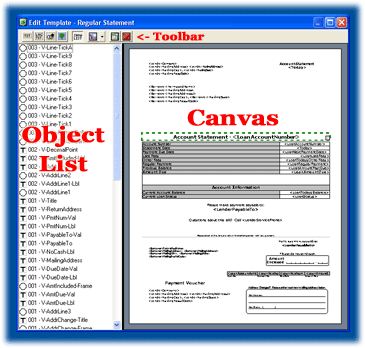
There are four types of template objects. They are described in detail under the heading "Structure of a Template" within the Templates help topic. The three components of the template designer are the Canvas, the Object List, and the Toolbar. The Canvas The Canvas represents a piece of paper with the same dimensions as your template. (Set the size of the template in the Edit Template Information dialog.) Everything on the canvas appears as it would when printed on paper. Click on a template object on the canvas to select it. A selected object is highlighted by a dashed green line around its border. The corresponding entry in the Object List is also highlighted. Right-click an object to open its corresponding Edit Template Object dialog. Click and Drag an object to reposition it on the canvas. Click and Drag the Grey Box in the bottom right corner of a highlighted object to adjust its size. The Object List The Object list shows all template objects associated with the current template. If an object is underneath another object and cannot be selected using the canvas, select it by clicking its name in the Object List. Click an object in the list to select it. Double-click an object to open it in the Edit Template Object dialog. Each object type has its own icon in the Object List: The Toolbar The Toolbar allows you to create new template objects and manage the existing ones. The first four buttons on the toolbar can be toggled on and off, one at a time. The When a button is depressed, clicking on the canvas or clicking and dragging on the canvas creates a new Template Object. Click the canvas to create the object at the position you clicked. Click and Drag to create the object with the position and size that match the box created during the drag motion. The The The ©2006 TrailsWeb LLC - All Rights Reserved |